
Starshipit: Rendr as Carrier
Overview
The Rendr + Starshipit integration connects your shipping and fulfilment workflow in Starshipit with Rendr’s domestic delivery services across Australia.
With this integration, you can:
- Generate packing slips and shipping labels in Starshipit
- Automatically correct and validate delivery addresses
- Offer branded tracking and delivery notifications to your customers
- Book Rendr deliveries directly when you fulfil orders
This integration is designed for Australian merchants who want to streamline fulfilment and label creation while taking advantage of Rendr’s express and flexible delivery options.
How it works
- Starshipit sends order and shipping details to Rendr when a delivery is created
- Rendr returns available delivery products and books the delivery
- Starshipit manages packing slips, labels, and address validation
- Rendr handles delivery fulfilment and tracking
Once set up, your team can simply select Rendr as the courier when fulfilling orders in Starshipit.
What you’ll need
- An activated Rendr merchant account
- Admin access to Starshipit, with permission to add and configure couriers
- Your Rendr credentials, provided by the Rendr team at onboarding:
- Client ID
- Client Secret
- Tenant ID
- Store ID
Before you start: Validate your pickup address
Your pickup address in Starshipit must exactly match the location or store address registered in Rendr. The Rendr team will confirm this address with you at onboarding.
Why this matters: If the addresses do not match, deliveries may fail to book or be collected from the wrong location.
Implementation steps
Step 1: Add Rendr as a courier
Step 2: Add Rendr services
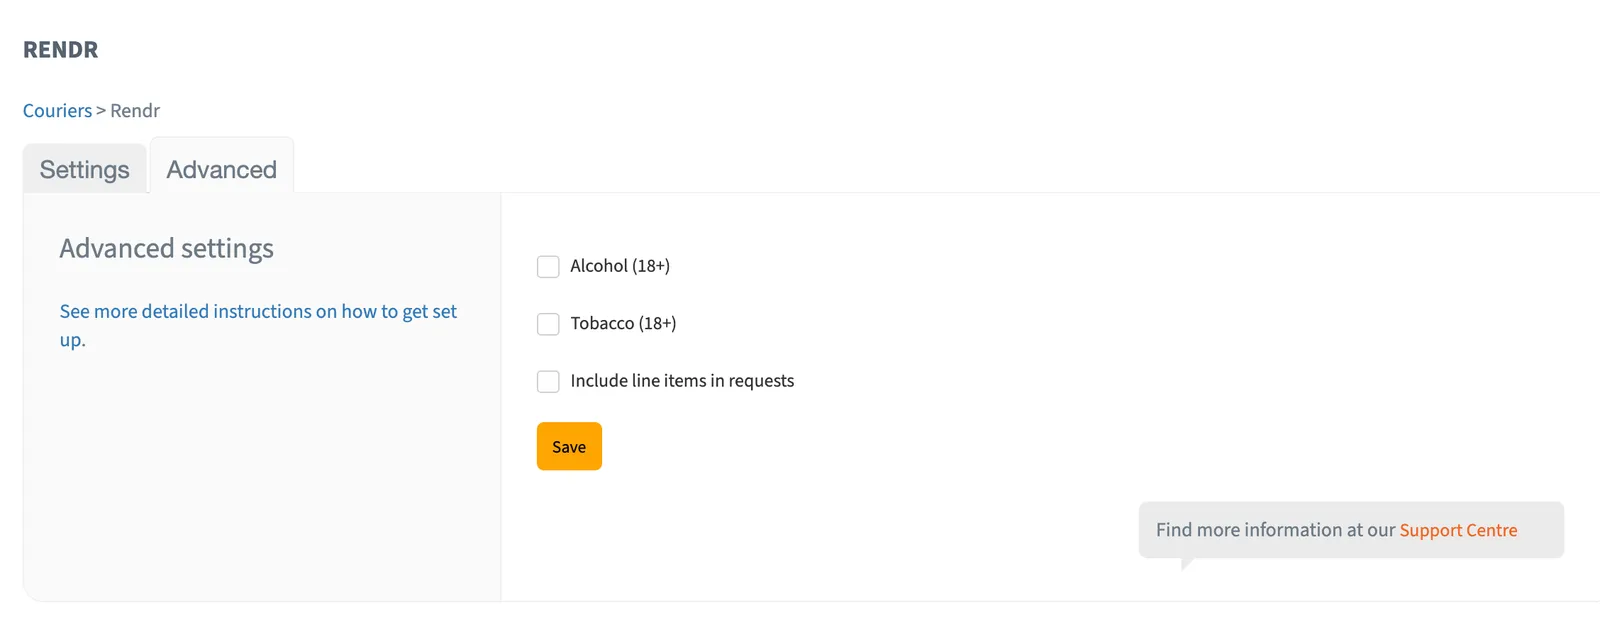
Step 3: Configure special delivery flags (if applicable)
Starshipit allows you to flag orders that require special handling. These flags ensure Rendr applies the correct delivery procedures.
Inside Rendr Courier Setting, go to “Advanced” tab.
Tobacco
To flag tobacco orders:
- Enable the Tobacco flag
- Or select “Include line items in requests” to flag on a per-order basis within the order details
This ensures Rendr applies tobacco-specific delivery requirements.
Alcohol
To flag alcohol orders:
- Enable the Alcohol flag
- Or select “Include line items in requests” to flag on a per-order basis within the order details
This ensures Rendr applies alcohol delivery requirements.
Step 4: Configure Rendr shipping rules
Shipping rules automatically assign Rendr as the courier for FAST and FLEXIBLE orders, without affecting your other Starshipit workflows.
Set shipping rules for SAME DAY (FLEXIBLE) Service
Set shipping rules for 3 Hour (FAST) Service
Optional rule: Authority to Leave (ATL)
By default, all Rendr orders are sent with Authority to Leave enabled. You can override this status by adding the following rule:
Step 5: Configure Rendr checkout rates (if applicable)
Only complete this step if you are offering Rendr rates at checkout through Starshipit. Skip it if you use Rendr’s eCommerce app or another integration method for checkout rates.
Once Rendr is connected as a carrier in Starshipit, follow the following steps to configure individual Rendr products as checkout rate options by:
- Go to Settings > Shipping > Checkout Rates > Click “Add new shipping option”
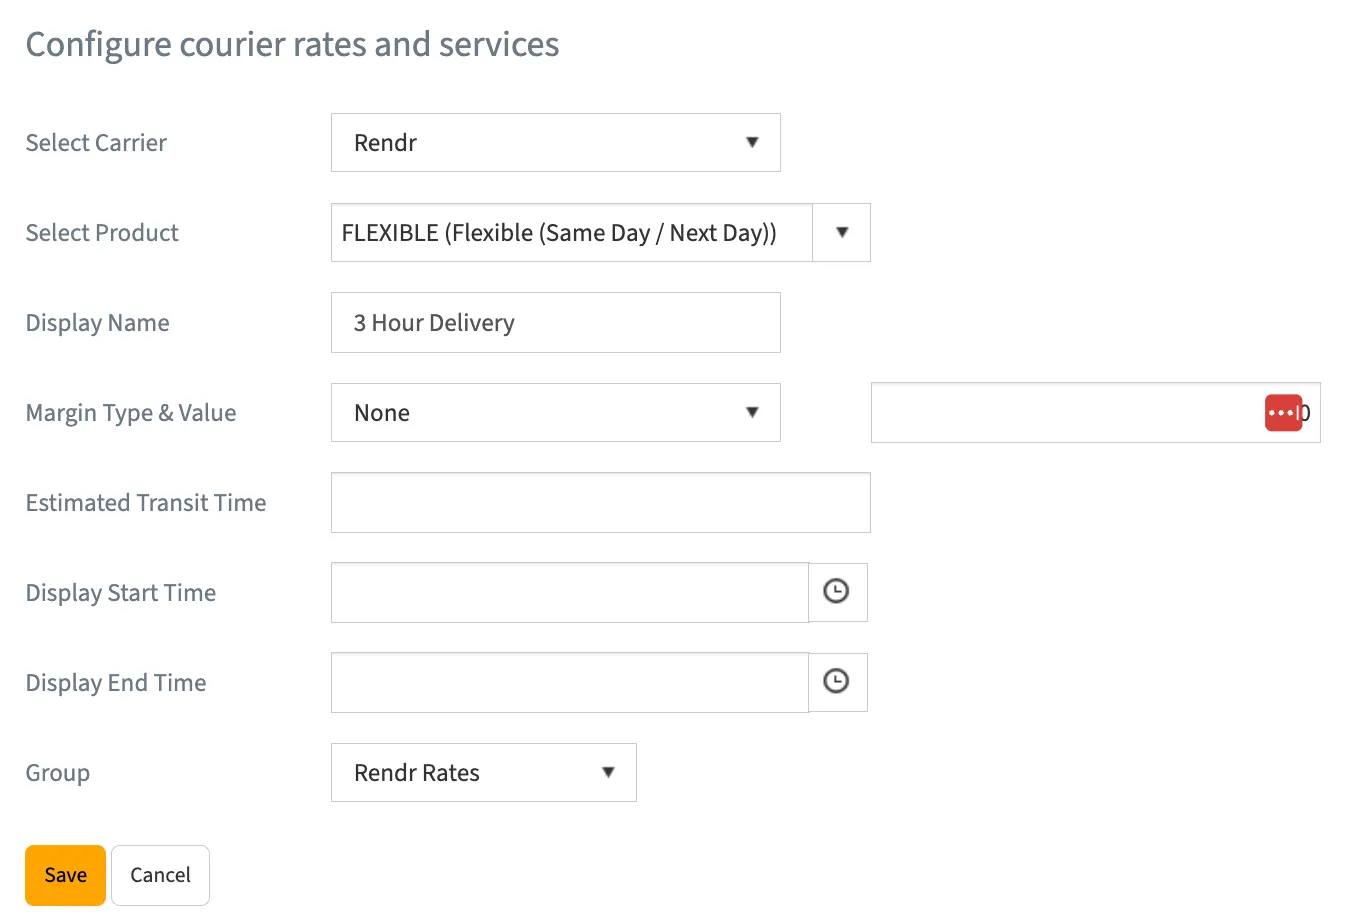
- Configure courier rates and services
- Select Carrier – Choose Rendr from the dropdown.
- Select Product – Choose the Rendr delivery product to offer:
- FAST (30 min – 3 hr) – for rapid, same-day delivery windows.
- FLEXIBLE (Same Day / Next Day) – for standard same-day or next-day delivery.
- Display Name – Set the customer-facing label shown at checkout
- FAST – “3 Hour Delivery”
- FLEXIBLE – “Same Day / Next Day Delivery”
- Margin Type & Value – Apply a margin on top of the base Rendr rate if required (None, Fixed, or Percentage).
- Estimated Transit Time – Optionally specify the transit time shown to customers.
- Display Start Time / Display End Time – Restrict when this rate option is available at checkout (e.g. cut-off times for same-day delivery).
- Group – Assign the rate to a group (e.g. “Rendr Rates”) so it displays alongside other Rendr options at checkout.
- Click Save.
- Repeat this process for each Rendr product you want to offer.
Testing
Testing confirms that orders flow correctly from Starshipit to Rendr before you go live.
Test 1: Create a test shipment
Success:
- The shipment is created with no errors.
- A Rendr delivery ID or booking confirmation appears in Starshipit.
Test 2: Check labels and packing slips
Success: Documents are generated correctly with accurate details.
Support and troubleshooting
Contact us
If you need assistance, contact Rendr Support.